I love weaving ribbon, string and more around alphas and elements on my layouts, so I thought I’d show you how I achieve these effects.


So how do I do it? I’ve written these instructions for Photoshop Elements, but hopefully they are some help you using different programs. I’m using Colour Coded 1 from the April FEMZ Grab Bag for this example.
Well first off, I position the ribbon where I want it to be and add my preferred shadow.

I move it to behind the lowest layer on the page that it will be weaving.

Then I duplicate the layer (Ctrl+J), remove the layer style and move it to be right at the top of the stack of layers (Ctrl+Shift+]) and add a layer mask (using Grant’s tools).

Ctrl+Click on the icon of layer you want to weave it behind (eg the frame). Then you can paint with your black brush within the selection onto the mask layer (or if you aren’t using a mask use your eraser) to delete the parts of the ribbon that should be behind the element.

An optional step is to duplicate the top ribbon again, place it below your top ribbon and then apply a shadow to this layer. You can then mask/erase so that there’s no unsightly shows back onto the frame. See what I mean? Before:

After:

This adds a shadow to the parts of the layer in front of the frame making it look more realistic.
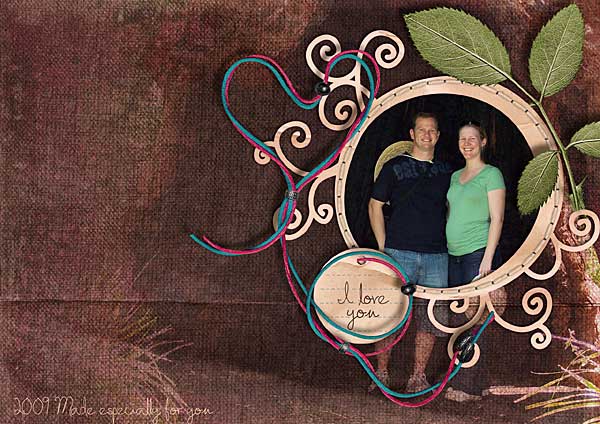
The end product looks like this:

Here’s my layers so you can see how I’ve done it.

This is a very simple example, but I hope this inspires you to try out some ribbon weaving with your titles too (just remember the Ctrl+Click to make sure you only delete the ribbon behind your letters etc!).
Oh and another little tip about shadows – if you are using layer styles you can use the same shadow settings on each object. After you have applied a style, you can copy the style and paste it into other layers:
1.To copy the style, select the layer with the style. Right-click and choose Copy Layer Style from the pop-up menu.
2.To paste a layer style, select the layer to which you want to paste the style. Right-click and choose Paste Layer Style from the pop-up menu.
Hollie Haradon and Jen Caputo uses slightly different methods you can view their video tutorial in Episode 1 of Jen Caputo’s Digital Scrapbooking TV here.
I hope you enjoyed this tutorial – comment below if you have any questions.
Have a great day!
![]()
Thank you for this tut. I always just carefully erased the element and shadow so it looked like it was weaved.
artgalstyle.blogspot.com
awesome information!!!!!!!
http://www.soinkincute.blogspot.com
First off, I am so very glad that you posted this tutorial! It would not have occurred to me to wrap ribbon around something. I’m not that creative, but I can be technical…
I use Photoshop CS3. I started looking at this tutorial and realized that in CS3, I’ve got some options that make it even easier.
I can choose the intersection of two selections by pressing the alt + Shift keys before I start to draw in my second selection. (The Mac symbol looks like a Y turned sideways + Shift) That’s how I select areas of my top ribbon layer to delete. I don’t use a Quick Mask and I can still be quite precise.
Please, if you could also include in your tutorial exactly what is masked, when you do apply your quick mask, it would be much clearer for folks that are using Elements.